If you want to improve productivity and work more efficiently, learning how to split a MacBook screen is one of the best tricks you can master. Whether you are a student, freelancer, designer, developer, or office worker, split screen mode helps you use two apps side by side without constantly switching between windows.
Modern MacBooks come with a built-in feature called Split View, allowing users to organize their workspace and multitask smoothly. In this guide, you will learn everything about how to split a MacBook screen, including setup methods, shortcuts, troubleshooting tips, and advanced multitasking techniques.
If you have ever wondered “what is meant by a new thread in ChatGPT”, this detailed guide will help you understand the concept in a simple and professional way. We will explain how threads work, why they matter, when to create a new thread, and how they improve your overall ChatGPT experience.
Table of Contents
ToggleWhat Does Split Screen Mean on a MacBook?
Split screen on a MacBook allows two applications to appear side by side in full-screen mode. Instead of opening and minimizing windows repeatedly, you can work on both apps simultaneously.
For example, you can:
- Write content while researching on Safari
- Attend Zoom meetings while taking notes
- Compare spreadsheets and reports
- Edit images while checking references
- Watch tutorials while practicing work
Understanding how to split a MacBook screen can save time and make multitasking much easier.
In simple words, a thread is like a dedicated conversation room. When you start a new thread, you open a new room for discussing a different subject.
For example:
- One thread may be about SEO learning
- Another thread may be about business marketing
- A separate thread may focus on coding help
- Another could be used for writing blog content
Each thread keeps conversations organized and easier to manage.
Benefits of Using Split Screen on MacBook
Split screen on a MacBook allows two applications to appear side by side in full-screen mode. Instead of opening and minimizing windows repeatedly, you can work on both apps simultaneously.
For example, you can:
- Write content while researching on Safari
- Attend Zoom meetings while taking notes
- Compare spreadsheets and reports
- Edit images while checking references
- Watch tutorials while practicing work
Understanding how to split a MacBook screen can save time and make multitasking much easier.
Think of ChatGPT threads like conversations in messaging apps.
For example:
- One WhatsApp chat is with a friend
- Another chat is with a client
- Another is with family
Similarly, ChatGPT uses threads to separate topics and discussions.
If you continue every discussion in the same thread, the conversation may become confusing because ChatGPT tries to remember the previous context of that specific conversation.
Starting a new thread helps keep things clean and focused.
Benefits of Using Split Screen on MacBook
Before learning the steps, let’s look at why split screen mode is useful.
Better Productivity
Using two applications at once helps reduce distractions and improves workflow.
Easy Multitasking
You can drag files, copy text, compare documents, and manage tasks faster.
Improved Organization
Split View keeps your desktop clean and organized.
Better Focus
Instead of dealing with multiple overlapping windows, you can focus on only the apps you need.
How to Start a New Thread in ChatGPT
Starting a new thread is very simple.
On Desktop
- Open ChatGPT
- Look for the “New Chat” button on the left sidebar
- Click it
- A fresh conversation window will open
This new chat is called a new thread.
On Mobile App
If you are using the mobile app:
- Open the ChatGPT app
- Tap the menu icon
- Select New Chat
- Start your fresh conversation
How to Split a MacBook Screen Using Split View
The easiest way to split screen on a MacBook is through the built-in Split View feature.
Step 1: Open Two Applications
Open the two apps you want to use side by side.
Examples include:
- Safari and Notes
- Chrome and Microsoft Word
- Excel and Calculator
- Final Cut Pro and Finder
Step 2: Hover Over the Green Button
Move your cursor to the top-left corner of the window.
You will see three colored buttons:
- Red = Close
- Yellow = Minimize
- Green = Full Screen
Hover your mouse over the green button.
Step 3: Choose Split Screen Position
A menu will appear with options like:
- Tile Window to Left of Screen
- Tile Window to Right of Screen
Select your preferred side.
Step 4: Select the Second App
After placing the first app, macOS will show your remaining open windows on the other side.
Click the second application to complete split screen mode.
Now both apps will appear side by side.
This is the simplest method for how to split a MacBook screen.
How to Adjust Split Screen Size on MacBook
After enabling split screen, you can resize both windows.
Steps to Resize
- Move your cursor to the center divider line
- Click and hold the divider
- Drag left or right
This lets you give more space to one application.
For example:
- Make Safari larger for research
- Keep Notes smaller for writing
How to Exit Split Screen Mode
Exiting split screen on MacBook is very simple.
Method 1: Using the Green Button
- Hover over the top area of the window
- Click the green button again
The app will return to normal mode.
Method 2: Press Escape
Some applications allow exiting full screen by pressing the Escape key.
.
MacBook Split Screen Keyboard Shortcuts
Using shortcuts can make multitasking even faster.
While macOS does not have a direct universal shortcut for Split View, you can use Mission Control and window management shortcuts.
Useful macOS Shortcuts
Shortcut | Function |
Control + Up Arrow | Open Mission Control |
Control + Left Arrow | Move between desktops |
Command + Tab | Switch applications |
F3 | Open Mission Control |
These shortcuts improve the overall split screen experience.
How to Split a MacBook Screen on macOS Ventura
If you are using macOS Ventura, the process is slightly more modern and user-friendly.
Steps for Ventura Users
- Open an application
- Hover over the green maximize button
- Choose:
- Tile Window Left
- Tile Window Right
- Select the second app
Apple improved Split View in Ventura for smoother multitasking.
How to Split a MacBook Screen on macOS Sonoma
macOS Sonoma also supports enhanced desktop management.
Features include:
- Better window snapping
- Faster transitions
- Improved Mission Control
- Smoother multitasking animations
The process for how to split a MacBook screen remains mostly the same.
Using Mission Control for Split Screen
Mission Control helps manage multiple desktops and full-screen apps.
Steps
- Swipe up with three fingers on the trackpad
- Drag one app over another
- Create a Split View workspace
This method is useful for advanced MacBook users.
Best Apps to Use in Split Screen Mode
Many apps work perfectly in split screen mode.
Productivity Apps
- Microsoft Word
- Excel
- PowerPoint
- Apple Notes
Browsers
- Safari
- Google Chrome
- Firefox
Communication Apps
- Zoom
- Slack
- Microsoft Teams
Creative Tools
- Photoshop
- Final Cut Pro
- Canva
Using these apps together can maximize productivity.
How to Split a MacBook Screen Without Full Screen
Some users prefer working without entering full-screen mode.
You can manually resize windows by:
- Dragging one app to the left side
- Dragging another app to the right side
- Adjusting their sizes manually
This method gives more flexibility.
Third-Party Apps for Better Window Management
If you want advanced features, you can use third-party window management tools.
Popular options include:
- Magnet
- Rectangle
- BetterSnapTool
- Moom
These tools provide:
- Window snapping
- Custom layouts
- Keyboard shortcuts
- Multi-window organization
They are useful for power users who frequently split screens.
Common Problems When Splitting a MacBook Screen
Sometimes users face issues with Split View.
Best Practices for Using New Threads
Split Screen Not Working
Possible reasons include:
- App does not support Split View
- Full-screen mode disabled
- macOS settings issue
Green Button Missing Options
Restart the app or update macOS.
App Won’t Resize
Some applications have fixed minimum sizes.
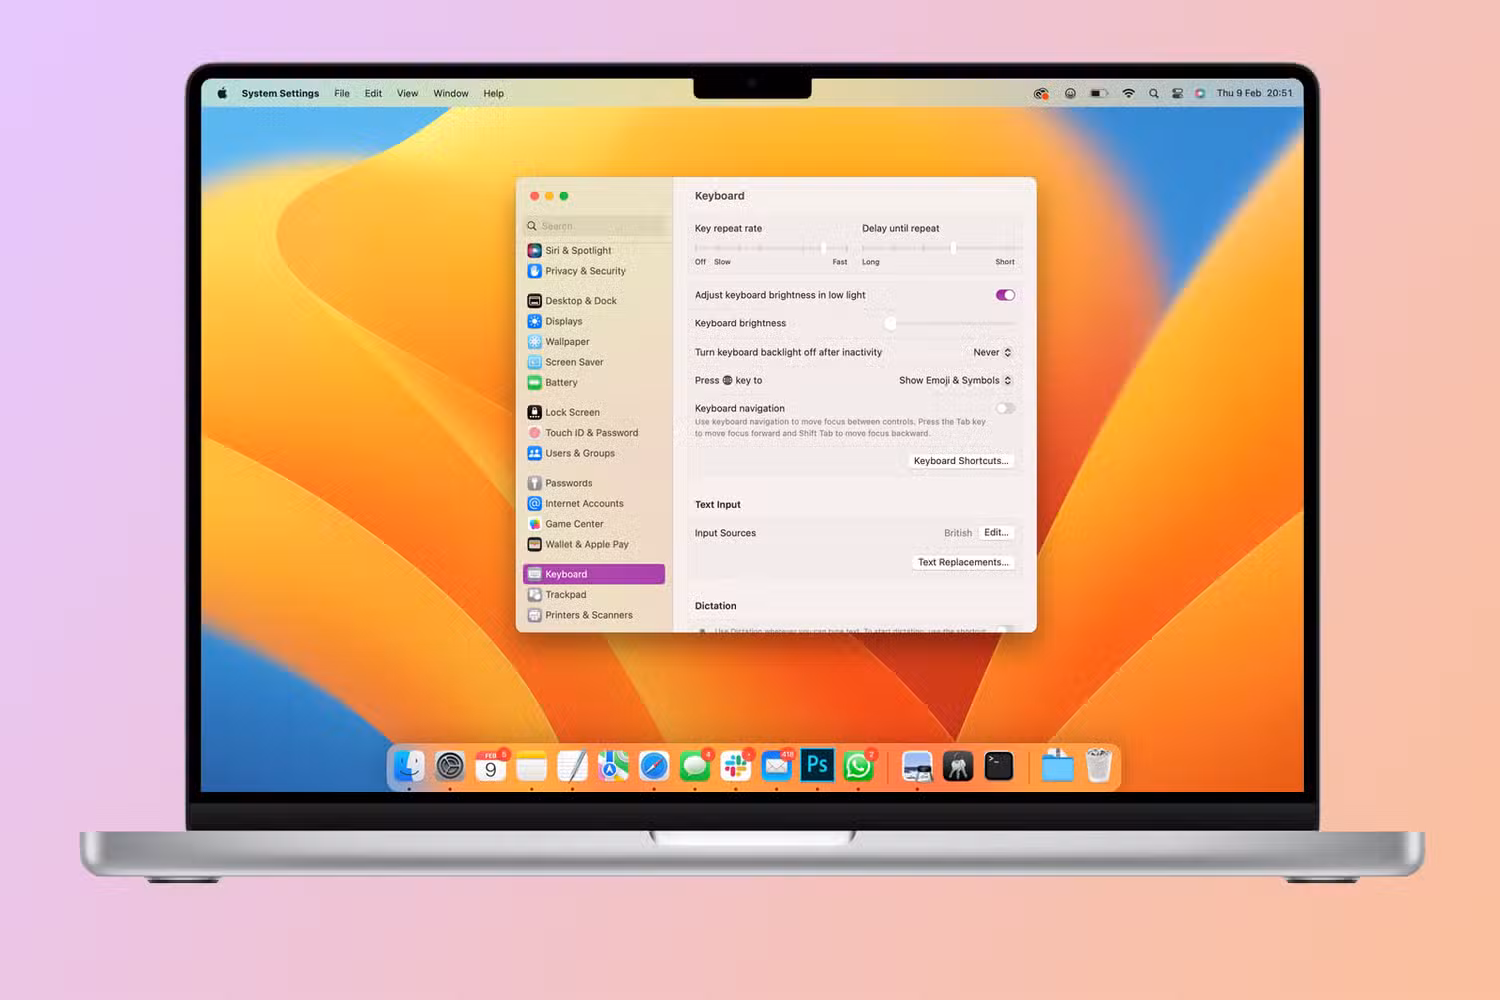
How to Enable Displays Have Separate Spaces
This setting is important for Split View.
Steps
- Open System Settings
- Go to Desktop & Dock
- Scroll to Mission Control
- Enable:
Displays have separate Spaces
Restart your MacBook afterward.
This setting often fixes split screen issues.
Split Screen Tips for Better Productivity
Learning how to split a MacBook screen is only the beginning. Here are some expert productivity tips.
Pair Apps Strategically
Examples:
- Browser + Notes
- Zoom + Word
- Photoshop + Reference Images
Use External Monitor
A second monitor increases multitasking space dramatically.
Keep Notifications Minimal
Disable unnecessary alerts while working.
Learn Trackpad Gestures
Trackpad gestures help switch between desktops faster.
Difference Between Split View and Stage Manager
New macOS versions include Stage Manager.
Split View
- Two apps side by side
- Full-screen focus
Stage Manager
- Organizes multiple windows
- Easier multitasking
Both are useful depending on your workflow.
How Students Can Use Split Screen on MacBook
Students benefit greatly from split screen mode.
Common Uses
- Online lectures + Notes
- Research + Assignment writing
- PDF books + Word documents
This improves study efficiency and note-taking.
How Professionals Use Split Screen
Professionals often use Split View for:
- Email + Spreadsheet management
- Coding + Documentation
- Video calls + Project notes
- Design + Client feedback
Knowing how to split a MacBook screen is now considered an essential productivity skill.
Split Screen for Content Creators
Content creators can use split screen for:
- Editing videos while checking scripts
- Writing captions while browsing references
- Managing social media dashboards
- Comparing thumbnails and designs
MacBook multitasking is especially valuable for creative professionals.
Best MacBooks for Multitasking
Modern MacBooks handle split screen very efficiently.
Popular options include:
- MacBook Air M2
- MacBook Air M3
- MacBook Pro 14-inch
- MacBook Pro 16-inch
These devices offer excellent multitasking performance.
Frequently Asked Questions
Can all apps work in split screen mode?
Most modern applications support Split View, but some older apps may not.
Does split screen slow down MacBook performance?
Usually no, especially on newer MacBooks with Apple Silicon chips.
Can I use more than two apps?
Yes. You can combine Split View with Mission Control or Stage Manager.
Is split screen available on all MacBooks?
Yes, most modern macOS versions support split screen functionality.
Final Thoughts
Learning how to split a MacBook screen can dramatically improve productivity, organization, and multitasking efficiency. Whether you are studying, working remotely, editing content, or managing business tasks, split screen mode helps you save time and stay focused.
Modern macOS versions make the process simple with built-in Split View tools, Mission Control, and advanced window management features. By combining the right apps and productivity techniques, you can transform your MacBook into a highly efficient workstation.
If you regularly multitask, mastering how to split a MacBook screen is a skill worth learning today.