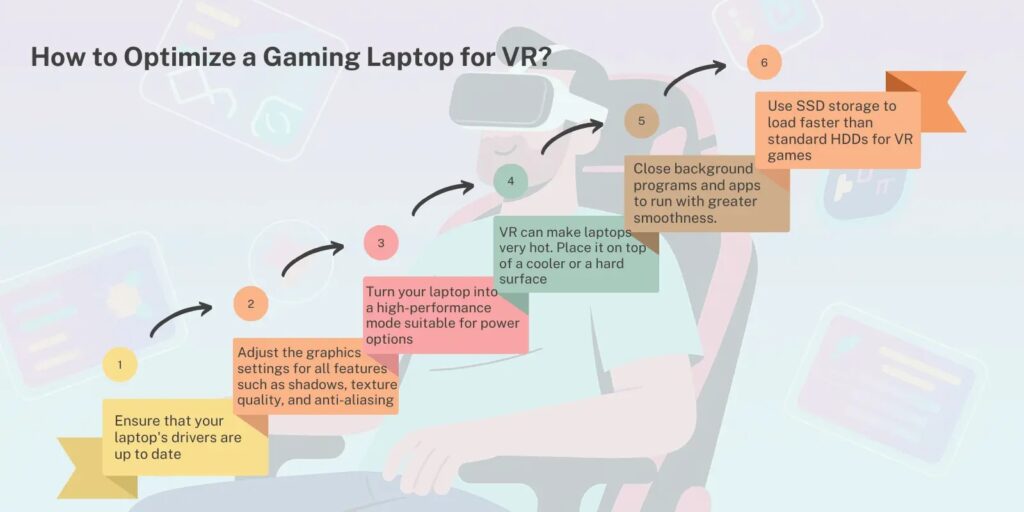
If you’re wondering how to optimize gaming laptop for VR, you’re probably preparing to dive into immersive virtual reality gaming. VR headsets like the Meta Quest, HTC Vive, or Valve Index demand significant processing power, graphics performance, and system stability. A gaming laptop can handle VR, but only if it’s properly optimized to deliver smooth performance and prevent lag, overheating, or compatibility issues.
In this guide, we’ll explore the best ways to optimize your gaming laptop for VR—from hardware adjustments to software tweaks—ensuring you get the best possible virtual reality experience.
Table of Contents
ToggleWhy You Need to Optimize a Gaming Laptop for VR

- Performance Boost: VR requires high frame rates to prevent motion sickness.
- Reduced Latency: Lag or stuttering can break immersion and cause discomfort.
- Stable Temperatures: Gaming laptops can overheat during VR sessions; optimization prevents throttling.
- Compatibility: Ensuring drivers, firmware, and headset software are updated avoids crashes.
- Battery and Power Efficiency: Proper settings ensure stable power delivery while gaming.
By learning how to optimize gaming laptop for VR, you’ll ensure a smooth and enjoyable VR experience
Step 1: Check VR Readiness of Your Gaming Laptop
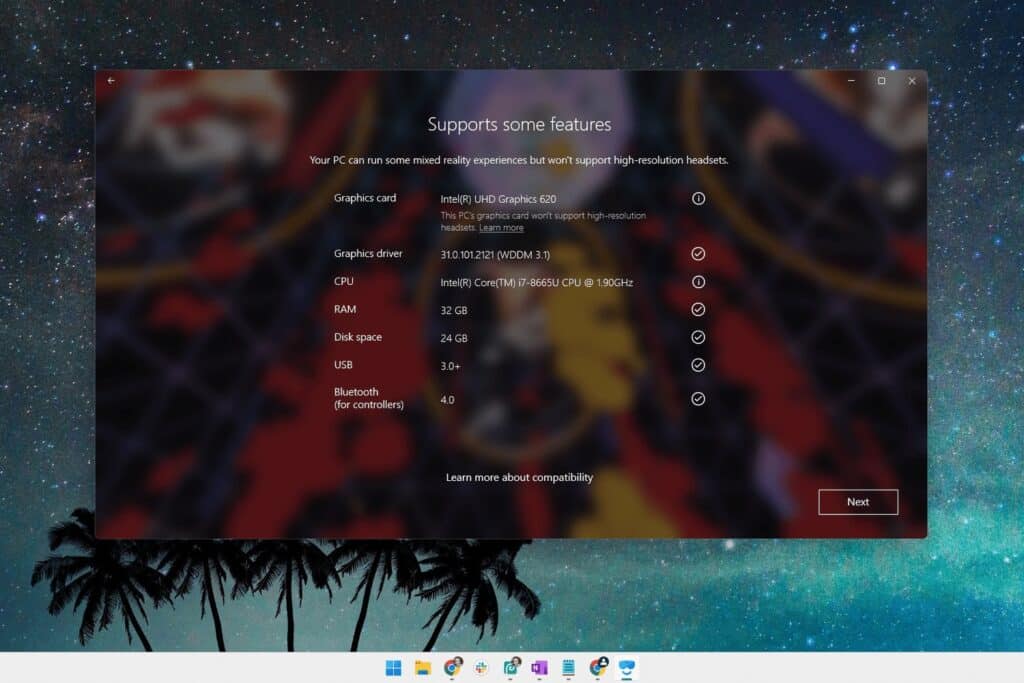
Before diving into VR optimization, the first step is to confirm that your gaming laptop meets the minimum requirements for virtual reality. VR applications are extremely demanding, and not every gaming laptop—even those with good specs—can deliver a smooth experience without proper hardware support. Checking your laptop’s VR readiness helps you identify potential bottlenecks early and ensures you’re not troubleshooting avoidable issues later on.
Recommended Specs for VR:
- CPU: Intel i7 or AMD Ryzen 7 (or higher)
- GPU: NVIDIA GTX 1660 Ti / RTX 2060 or AMD RX 5700 (minimum)
- RAM: 16GB or more
- Ports: USB 3.0, HDMI/DisplayPort
- Operating System: Windows 10 or Windows 11 (64-bit)
Tools like SteamVR Performance Test or Oculus Compatibility Tool can check if your laptop is VR-ready.
Step 2: Keep Your Drivers and Firmware Updated
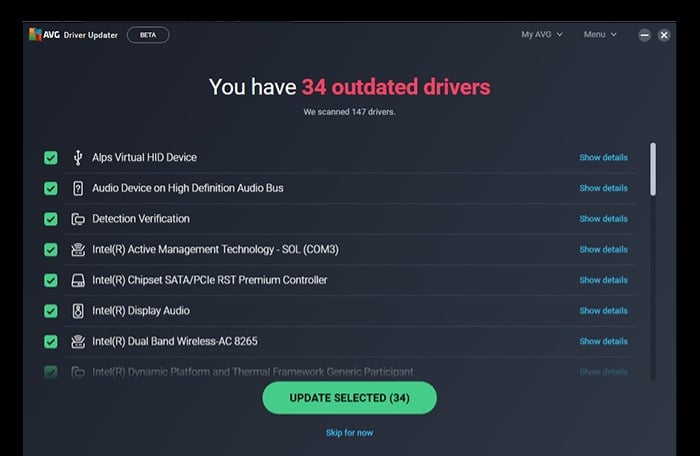
One of the most important steps in how to optimize gaming laptop for VR is updating software.Keeping your drivers and firmware up to date is one of the simplest yet most effective ways to ensure your gaming laptop performs smoothly in VR. Outdated drivers can cause frame drops, connection errors, or even complete headset detection failures. Regular updates improve compatibility, fix known bugs, and often introduce performance optimizations specifically designed for new VR titles and hardware.
1. Update Your GPU Drivers
Your graphics card handles the heavy lifting in VR, so keeping its drivers current is crucial.
- NVIDIA Users: Use GeForce Experience to automatically check for and install the latest drivers.
- AMD Users: Use Radeon Software (Adrenalin Edition) to stay up to date.
Updated GPU drivers often include VR-specific optimizations, enhancing frame rates and visual stability.
2. Update VR Headset Firmware and Software
Most headsets—like Meta Quest, HTC Vive, and Valve Index—receive regular firmware updates that improve tracking, stability, and performance.
- Connect your headset to its companion app or platform (e.g., Oculus app or SteamVR) to check for updates.
- Updating firmware also ensures better compatibility with your laptop’s GPU drivers and Windows updates.
3. Keep Windows and BIOS Updated
- Windows Updates: Regular OS updates provide critical patches for USB drivers, Bluetooth connectivity, and system stability—all essential for VR devices.
- BIOS/Firmware Updates: Check your laptop manufacturer’s website for BIOS or firmware updates that can improve system performance and power management.
4. Reboot After Updates
Always restart your system after installing new drivers or firmware to apply changes correctly and prevent conflicts.
Step 3: Optimize Graphics Settings for VR
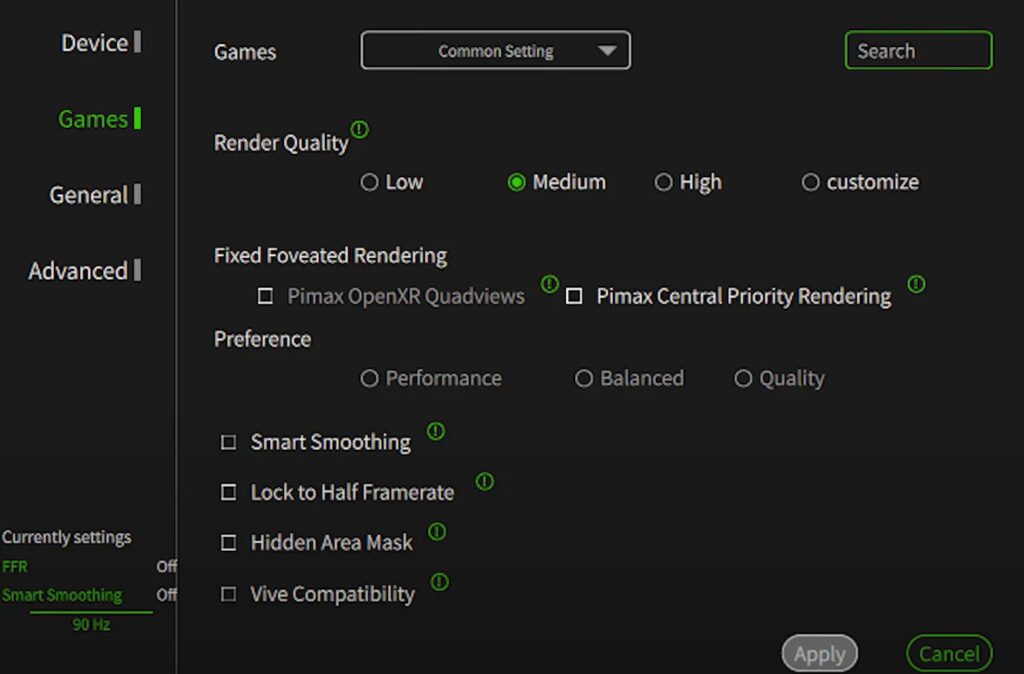
Once your laptop is VR-ready and fully updated, the next step is to fine-tune your graphics settings for the best balance between performance and visual quality. Unlike traditional gaming, VR requires consistently high frame rates—typically 90 FPS or higher—to maintain immersion and prevent motion sickness. Optimizing your settings ensures smooth gameplay, reduces latency, and keeps your system running efficiently without overheating.
1. Adjust In-Game or VR Platform Settings
Each VR game or platform (such as SteamVR, Oculus, or Windows Mixed Reality) lets you tweak performance settings.
- Resolution/Render Scale: Lowering this slightly can significantly improve performance without drastically reducing image quality.
- Anti-Aliasing: Keep this setting moderate; high levels can cause frame drops.
- Shadows and Reflections: Reduce or disable these if you experience lag—they often consume a lot of GPU resources.
- Texture Quality: Medium to high is fine for most modern GPUs; ultra settings may cause unnecessary strain.
2. Enable Performance Modes
- GPU Control Panels:
- In NVIDIA Control Panel, set “Power Management Mode” to Prefer Maximum Performance.
- In AMD Radeon Software, enable Radeon Chill or Radeon Boost depending on your needs.
- Laptop Power Settings: Switch to High Performance mode in Windows Power Options to prevent your CPU and GPU from throttling during gameplay.
3. Use VR Optimization Tools
- SteamVR Settings: Adjust the “Video” and “Per-Application Video Settings” to tailor performance for each game.
- Oculus Tray Tool: Lets you control supersampling and ASW (Asynchronous Spacewarp) for smoother visuals.
- Windows Mixed Reality Settings: Adjust render resolution and reprojection settings for performance stability.
4. Monitor Frame Rates and Temperatures
Keep an eye on your system’s performance using tools like MSI Afterburner or HWMonitor.
- Aim for a minimum of 90 FPS to avoid stutter and motion sickness.
- If temperatures rise too high, consider lowering graphics settings further or using a cooling pad.
Step 4: Manage Power Settings for VR Gaming
Power management plays a crucial role in maintaining consistent performance during VR gaming. Gaming laptops are designed to balance power efficiency and performance, but VR demands sustained high output from your CPU and GPU. If your laptop automatically switches to a power-saving mode, it can cause frame drops, lag, or headset disconnections. Adjusting your power settings ensures stable performance and prevents thermal or battery-related slowdowns.
1. Switch to High-Performance Power Mode
Windows Power Settings:
- Open Control Panel → Hardware and Sound → Power Options.
- Select High Performance or Ultimate Performance (if available).
- Ensure the laptop remains plugged into AC power while gaming—battery mode can limit GPU performance.
2. Disable Power-Saving Features
- Turn off features like USB selective suspend, PCI Express power management, and sleep timers while gaming.
- These can interfere with VR peripherals and cause disconnects or latency spikes.
3. Optimize GPU Power Settings
NVIDIA Users:
- Open NVIDIA Control Panel → Manage 3D Settings → Power Management Mode → Prefer Maximum Performance.
AMD Users:
- In Radeon Software, enable Radeon Boost or manually set performance tuning to ensure stable GPU frequency.
4. Use Manufacturer Performance Utilities
Many gaming laptops come with built-in utilities that control performance profiles:
- Alienware Command Center, ASUS Armoury Crate, MSI Dragon Center, or Lenovo Vantage.
- Select Gaming or Turbo Mode to increase power delivery and improve cooling performance during VR sessions.
5. Keep It Cool and Consistent
Even with high power output, overheating can cause your laptop to throttle (reduce performance to control temperature).
- Use a cooling pad or elevate your laptop to improve airflow.
- Clean vents regularly to avoid dust buildup.
Step 5: Optimize Laptop Cooling for VR
Overheating is a common issue in gaming laptops. Because these devices pack powerful components like high-end CPUs and GPUs into compact bodies, they generate a significant amount of heat—especially during demanding tasks such as VR gaming or long play sessions. Excessive heat not only reduces performance by causing thermal throttling but can also shorten the lifespan of your hardware. Preventing overheating is essential for maintaining smooth gameplay, system stability, and overall device health. Here’s how to prevent it:
- Use a Cooling Pad: Improves airflow underneath the laptop.
- Clean Vents and Fans: Dust buildup can cause overheating.
- Undervolt CPU/GPU: Tools like Intel XTU or ThrottleStop can reduce heat without lowering performance.
- Monitor Temperatures: Use apps like MSI Afterburner or HWMonitor.
Keeping temperatures stable ensures your laptop doesn’t throttle during VR gaming.
Step 6: Close Background Apps and Processes
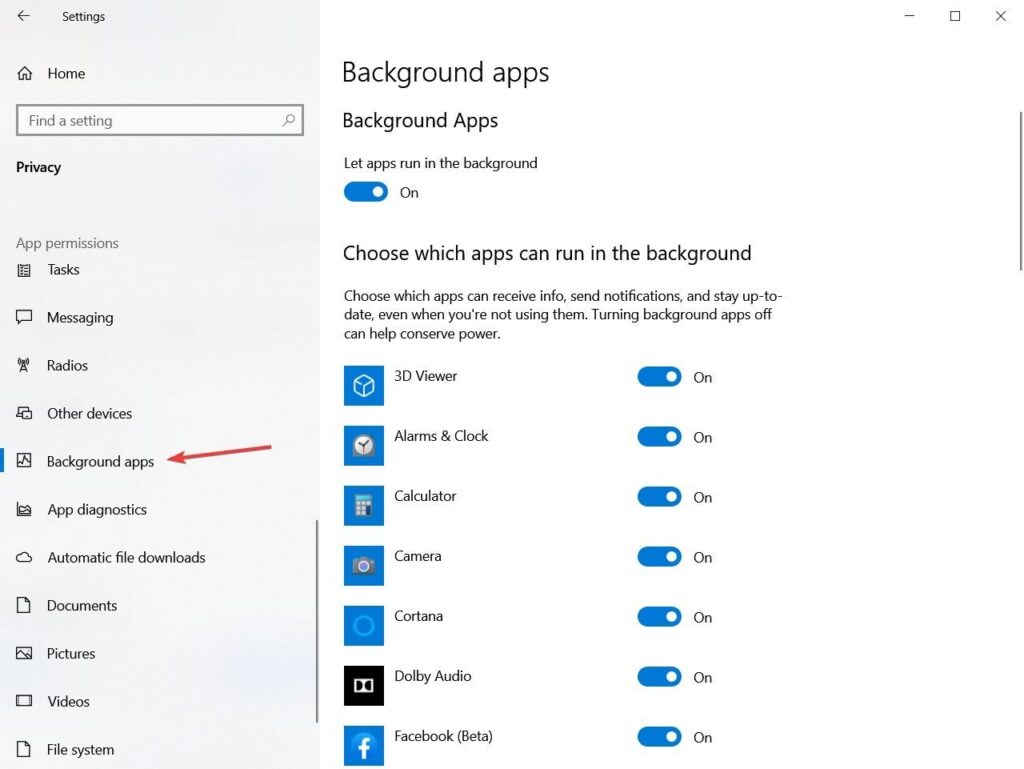
VR demands high system resources. Running virtual reality applications pushes your CPU, GPU, and memory to their limits, as they must render high-resolution graphics at fast frame rates for a smooth experience. If your system is cluttered with unnecessary apps or background tasks, performance can drop, causing lag or stuttering during gameplay. Freeing up memory and CPU resources ensures your VR setup runs efficiently and delivers an immersive experience.
- Press Ctrl + Shift + Esc to open Task Manager.
- Close apps like browsers, Spotify, or background updaters.
- Disable startup programs you don’t need.
This reduces background CPU/GPU usage, giving VR apps more resources.
Step 7: Optimize VR Software Platforms
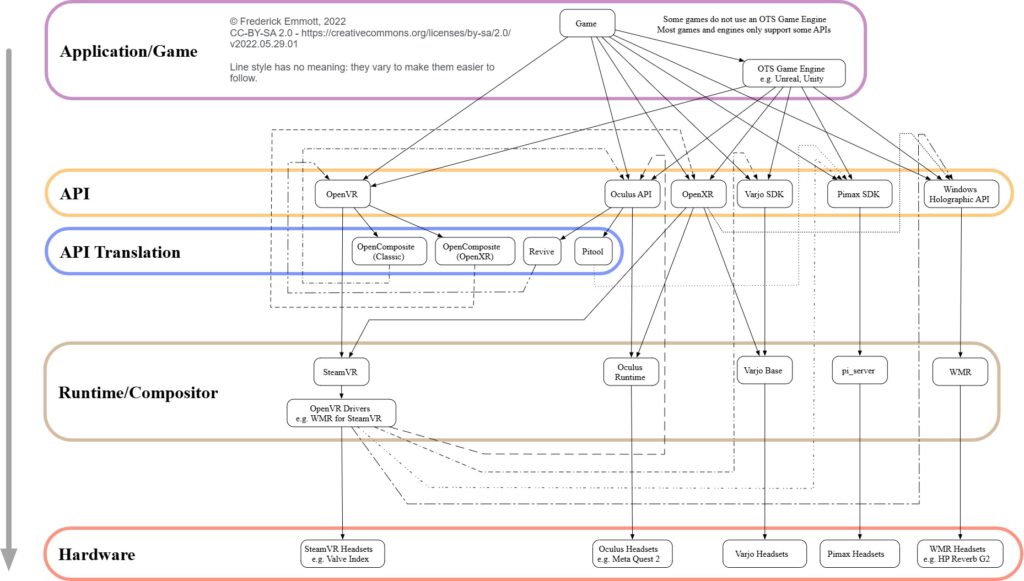
Depending on your headset, you’ll use different platforms. Each VR headset runs on its own software ecosystem, which manages how games and applications interact with your hardware. Properly configuring these platforms is crucial for achieving the best performance and visual quality. By adjusting graphics settings, refresh rates, and resolution scaling, you can balance smooth gameplay with lower system strain. Understanding how to fine-tune each platform ensures your VR experience remains immersive and stable across different devices.
Oculus/Meta Headsets
- Open the Oculus app.
- Set Graphics Preferences to match your laptop GPU.
- Adjust refresh rates for smoothness (72Hz, 90Hz, 120Hz if supported).
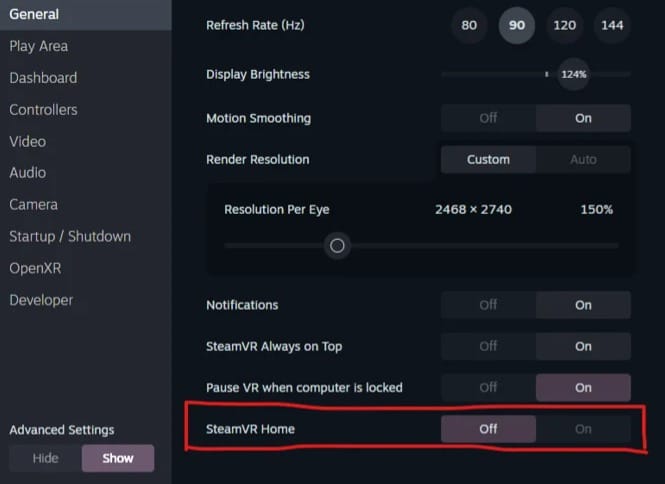
SteamVR
- Open SteamVR Settings > Video.
- Set per-application resolution scaling.
- Enable Motion Smoothing for stable framerates.
HTC Vive / Valve Index
- Use Vive Console or SteamVR to tweak performance.
- Match refresh rate settings with your laptop’s GPU capacity.
Troubleshooting Common VR Performance Issues
Even with optimization, issues may arise. Here’s how to fix them:
1. Lag and Stuttering
- Lower graphics settings.
- Use SteamVR’s Performance Graph to identify bottlenecks.
2. Overheating
- Ensure proper cooling.
- Reduce resolution or refresh rate in VR settings.
3. Headset Not Detected
- Reconnect USB/HDMI cables.
- Reinstall VR software drivers.
4. Low Frame Rates
- Reduce super-sampling in SteamVR.
- Update GPU drivers.
Advanced Tips for VR Optimization on Lenovo, ASUS, MSI, and Alienware Laptops
- Enable Hardware-Accelerated GPU Scheduling in Windows settings.
- Disable Game Mode if it causes stuttering (sometimes it helps, sometimes it doesn’t).
- Overclock GPU cautiously with MSI Afterburner for extra performance.
- Use Ethernet instead of Wi-Fi for wireless VR streaming.
Final Thoughts
Learning how to optimize gaming laptop for VR is essential if you want smooth, immersive, and lag-free virtual reality experiences. By updating drivers, adjusting graphics, managing power settings, cooling your system, and fine-tuning VR software, you can maximize performance on any gaming laptop.
With the right optimizations, your VR headset will run smoothly, your games will look sharper, and your laptop will stay cooler—allowing you to enjoy the full potential of virtual reality in 2025 and beyond.
FAQ: How to Optimize a Gaming Laptop for VR
Ans: Laptops have compact cooling systems and power limits that restrict sustained performance. While gaming laptops can handle VR, optimizing cooling, closing background apps, and adjusting graphics settings can help maintain stable frame rates.
Ans: Use a cooling pad to improve airflow, clean dust from vents and fans, and avoid placing your laptop on soft surfaces. Monitoring temperatures with apps like HWMonitor or MSI Afterburner helps you catch overheating early.
ullamcorper mattis, pulvinar dapibus leo.
Toggle Content
Ans: Yes. Background processes like browsers, music players, or system updaters consume CPU and memory. Closing them frees up resources, improving performance and reducing heat.
Ans: Open the Oculus app, go to Graphics Preferences, and match settings to your GPU’s capability. Adjust the refresh rate (72Hz, 90Hz, or 120Hz) based on performance balance between smoothness and system load.
Ans: In SteamVR Settings > Video, adjust per-application resolution scaling and enable Motion Smoothing. This helps maintain a stable frame rate even when your GPU is under pressure.
Ans: Undervolting isn’t mandatory, but it can help lower heat output and prevent throttling without affecting performance. Tools like Intel XTU or ThrottleStop make the process easier—but follow guides carefully.
Ans: At least 16GB of RAM is recommended. VR applications use more memory than standard games, and having enough ensures smoother gameplay and faster loading times.
Ans: Yes, and it’s recommended. Running on battery can limit your laptop’s performance due to power-saving features. Keeping it plugged in ensures consistent power and better VR stability.
Ans: Check your GPU (e.g., NVIDIA GTX 1660 Ti or higher), CPU (Intel i5/Ryzen 5 or better), and RAM (16GB+). You can also run the SteamVR Performance Test to verify compatibility with your headset.
Ans: Resolution scaling, texture quality, and refresh rate have the most impact. Lowering resolution scaling slightly can improve frame rates significantly without sacrificing visual clarity.